If you want to connect the i2c lcd display screen to the arduinouno, you first need to understand the i2c bus of the arduinouno, and then connect to the bus according to the i2c address of the tft display.
1: How to connect the i2c LCD display to the arduinouno? To connect the i2c LCD display to the arduino uno, you need to connect the sda, scl, vcc, and gnd pins of the LCD display to the a4, a5, 5v, and gnd pins of the arduino uno respectively. Then set the resolution of the LCD to 128*64, and set the i2c address of the arduino uno to 0x3c. Finally, burn the test code to the arduino uno board for testing.
2: The connection method between arduino uno and i2c lcd display To connect the i2c tft display to arduino uno, you need to connect the SDA pin of the display to the A4 pin of arduino uno, and connect the SCL pin of the display to the A5 pin of arduino uno.
3: Test code Finally, let’s take a look at the test code. This code realizes displaying a “hello world” string on the arduino uno. If you want to know the i2c bus of arduinouno or the i2c address of the display, you can refer to the following link. Link 1: arduinouno’s i2c bus Link 2: Display’s i2c address
1. Connect directly to Arduino
The advantage of being directly connected to the Arduino is that there is no need to buy an additional adapter board, but the consequence of this is that a large number of IO ports of the Arduino will be occupied. If your project does not have many external sensors, that’s okay, but if you need to connect many external sensors or other accessories, then your IO port will be in a hurry~
materials needed
1x Arduino UNO
1x LCD 16×2
1x 10KΩ rotary rheostat
1x breadboard
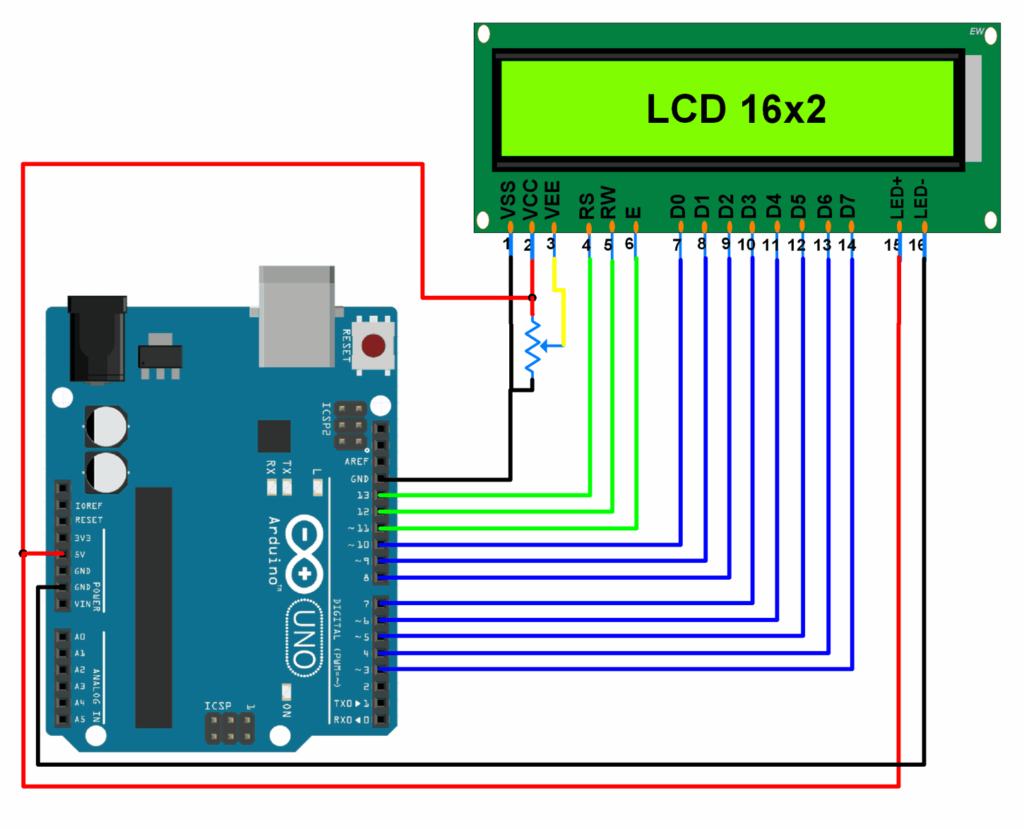
Wiring diagram
Wiring diagram of LCD directly connected to Arduino
LCD Arduino
RS -> 12
E -> 11
D4 -> 5
D5 -> 4
D6 -> 3
D7 -> 2
VCC -> 5V
R/W -> GND
GND -> GND
LCD rotary rheostat
VCC -> left pin
Vo -> middle pin
R/W -> right pin
GND -> right pin
Load library file
In Arduino IDE 1.6.2 or above, search for tft lcd display in Project->Load Library->Manage Library, and then install it.
sample code
// include the library code:
#include <LiquidCrystal.h>
// initialize the library with the numbers of the interface pins
LiquidCrystal lcd(12, 11, 5, 4, 3, 2);
void setup() {
// set up the LCD’s number of columns and rows:
lcd.begin(16, 2);
// Print a message to the LCD.
lcd.print(“hello, world!”);
}
void loop() {
// set the cursor to column 0, line 1
// (note: line 1 is the second row, since counting begins with 0):
lcd.setCursor(0, 1);
// print the number of seconds since reset:
lcd.print(millis()/1000);
}